

Whatewer you use- maya fur, or shave and haircut - rules and workflow will be the same.
RULES
1) NEVER USE RAYTRACE WITH FUR!
Any rule you can violate, if you understand them clearly.
This is not exclusion-if you need to render fury sphere with 10 000 hairs- no problem:
turn on FG, soft raytrace shadows, use occlusion and nothing terrible happend.
But when you will have deal with real fury character, grass or any other scene with a lot of fur-
raytrace can cause more headache then bennefit. So one more time:
NEVER, NEVER USE RAYTRACE WITH FUR!
2) Render fur as hair primitives.At first test you may deside that volume fur looks better and render faster. Belive me,
when you switch from tests to real project volume fur cause a lot of unpredictable results.
3) Render with RASTERIZER.
4) Render with puppet shaders pack.
Download and install.
I will not explain how to archieve desired appearence of fur. Just how you can render it.
I`ve create simple scene with 2 spheres. Spere "A" has shave and haircut grass fur preset,
sphere "B"- maya fur grass preset. I`ll explain workflow for both, choose what you need.

Now set render type of your fur to hair primitives.
Shave> shave shave globals
Fur>fur render settings

In render globals Set primary render to Rasterizer and turn off raytracing.
Since we would use p_MegaTK_pass for splitting image into passes you shoud set Flter type
to gauss to avoid artifacts. Render.

Now shading of fur defined by shave an fur inside engines.
With p_HairTK we can replace that shading parameters with native material to have grater
controll over fur shading and much better performance. Create p_HairTK material.
For maya fur:
Create p_shader_replacer geometry shader.
Enter the name of p_HairTK SHADING GROUP in material(Shading group) section.
Rename TRANSFORM node of fur feedback to someting started from "p",
for example "p_FurFeedback". It`s seems strange, but its very important step:)Enter the name TRANSFORM node of fur feedback in Object(0) section.

create polyCube, check "enable geometry shader" in mental ray section of TRANSFORM node.
Drag an drop p_shader_replacer to geometry shader slot.One more hint: FurFeedback group MUST BE ON TOP of this cube in outliner.
For Shave and haircut:
Select shavedisplay node, assign p_HairTK. Turn off "override geo shsder" in
material properties section of shaveHairShape. Thats all:)
Adjust p_HairTK as you need (i just made its color blue). Render.

Now its time to setup lights. On account of we use no raytrace and accordingly raytrace shadows,
lighs would be Spots with details shadows. One or cople key lights with strong shadows, and a lot
of fill lights with soft shadows (4, 5, 10 ... deppending on situation) to fake GI and FG.
With such setup easy to achieve perfect look an render would be quite fast.
Remember, that puppet shaders pack require usage puppet lights with maya spots.
Create spot light, p_SpotTK (mentalray light shader), p_HairTK_shadow (shadow shader).
Plug p_SpotTK to light shader slot, p_HairTK_shadow to shadow shader of p_HairTK SG.
p_HairTK_shadow give grater control over shadow look.
Use such settings for keylights: resolution= 1024 and more, softnes= 0.001-0.002,
samples 16 and more, detail- samples 4 and more, acuracy -0.001, do not touch bias.
For fill lights use smaller maps and biger softnes.

With one key light:

Fill light added:

Last step is to get our image divided into passes.
Create one more polyCube and p_MegaTK_pass (geometry shader).
Check "enable geometry shader" in mental ray section of TRANSFORM node.
Drag an drop p_MegaTK_pass to geometry shader slot.
Setup p_MegaTK_pass parameters as you wish. Render.
I give short description of output node parametes in article about Deex shader,
wich based on puppet shaders pack and p_MegaTK_pass comlete the same.
Read mental ray production workflow if you need more information about it.

If you want to get occlusion- turn on raytracing in render globals and plug mib_amb_occlusion
to custom occlusion slot of p_HairTK shader.
I create another p_HairTK shader with its own mask chennal, make it red and
plug ocllusion in it. Btw render time after i use occlusion rise from 20 sec to 15 min.
That`s why NEVER USE RAYTRACE WITH FUR!

Scene
Possible reasons of fur flickering in animation:
1) mesh smooth node on maya fur geometry with smooth UV= ON, if so- turn it off.
2) flickering shadows- rize shadow map samples.
3) overal flichering - be sure in p_HairTK all variations (saturation, color, gain)= 0.
____________________________________________________________
Here is real example of workflow, which was used for fury creatures in feature film.

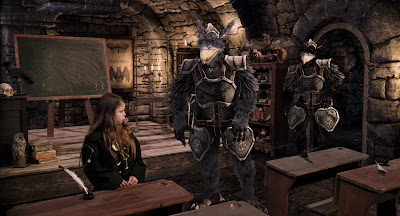


There was about 8 characters, some of them almost bald, but couple were really hairy.
More than 200 shots with fur we had totally.
Generally, each character for each shot was rendered in 2 different scenes:
A) Master scenes.
Character itself -beauty, passes, IDs, shadows and a huge list of other stuff.
B) Fur scenes.
Character fur and all what related to it. Black surface shader was apply to character geometry.
Puppet shaders assigned to fur. Puppet lights apply to lights.
Puppet shaders assigned to fur. Puppet lights apply to lights.

The master scenes was illuminated with bunch of lights, no GI or FG was used.
This made light setup for fur more easy, we just need to adapt existing lights:
switch raytrace shadows to depth map shadows with proper softens,
connect puppet shader to each light and copy some attributes(power, angle, decay rate etc) from original light
to puppet light .
At the beginning this took too much time and such dumb job was not to exsiting, so mel script was created,
wich did all this job automaticaly with one click.
Involving of human brain were necessary only for optimizing lights by deleting light sources,
which impact on image was not crucial.

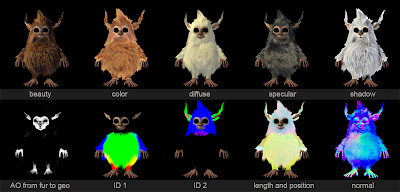
The task was to deliver fur with such data: Beauty + passes, Ambient Occlusion, Shadows from hairs to character.
Separate render layer were used for each task:
1) Beauty + passes(color, diffuse,
This allow compositor to tweak overall look of fur after render to make it more pretty and to fit it to shooting plate more easy.
Also supervisor wish to have light contributions- diffuse pass for each light separately to have grater control over lighting,
but i didn`t find the way to do it during render main passes, so finally we refuse this idea.
but i didn`t find the way to do it during render main passes, so finally we refuse this idea.
The obvious way- to render fur with each light separately on separate render layer was unacceptable because of huge render time.
Mental core seems will have this awesome feature
Mental core seems will have this awesome feature
One more problem which wasn`t solve- motion vectors. Bunch of shaders and ways were tested, but none of them give proper result.
Post MB without vectors was applied in Nuke.
Post MB without vectors was applied in Nuke.
So, puppets shaders did all job of creating passes perfectly. Only one annoing bug were present-
sometimes, some frames has NaN pixels in specular pass. But re rendering bad frames solves this issue.
sometimes, some frames has NaN pixels in specular pass. But re rendering bad frames solves this issue.
Still dont know the reason why it happened.

Technically its very easy to get AO on hairs, just plug mib_ambient_occlusion to custom occlusion slot of p_HairTK.
But... the render time rise unbelievable. After some tests i discover that calculating occlusion on character geometry from fur was reasonable fast.
So i decide to calculate honest raytraced AO from fur on character during beauty render layer, and create fake AO on fur itself in another render layer.
To turn off calculation of AO on fur itself use miLabel
Since black surface shader was on character geo its impossible to get AO on geo directly, cos puppet buffer system dont support maya shaders.
So i just put result of raytraced AO to alfa chennal. This gives not proper alfa for hairs, but pure alfa of hairs i get from IDs (masks).
(beauty alfa) minus (ID 1+ ID 2 + ... + ID n) = AO from hairs to geo.

2) Ambient occlusion.
The main idea how to fake AO come from early approaches how to get good outdoor lighting without raytracing at all.
Light dome from 12 lights with depth maps shadows in combination of pure white hair shader gave pretty good result.
For each character light dome was connected to geometry with rivet plugin so it inherit position of character in scene.
Render time was fast, and also it can be additionally tweak by changing shadow resolution and samples of each light in dome.
Nobody say to compositors that AO was faked, and nobody of them discover this.

3) Shadows from hairs to character. Was used only for long hairs, like beard. For other cases AO from fur to geo was enough.
Obvious and easy. Use_background shader for geometry, turn off primary visibility for fur, low down hair resolution, aply simple shader without takin to account light information.
Leave only key lights and disconnect puppet shaders from lights(use_background wont work with them).

Cople of additional remarks.
The mail goal, as usual, was to balance descent quality and reasonable render time.
Since Rasterizer has separate managing of shading and geometry quality its obvious to use low shading quality, like 1 and play only with visibility samples.
Values like 20 gives very nice result, but for heaver guys it was lower down. This values is up to you, they should rely on rendering power you has.
One more parameter witch affect render time is bucket size. It depends on image resolution and amount of fur in frame. But generally for 2K frame 30 is proper value.
The biggest bucket size is- the fastest render you get, but more RAM used. The values to play with is 15, 30, 60.
The good way to setup this parameter (and overall ability of your computer to handle desirable amount of fur) is to hide all lights and render without them.
If your image will be render- this mean that it could be render with lights and shadows. If not- you have to lower hair count.
Thats all for mentalray fur.
